
Wednesday, July 27, 2011
Sneak Peek!
Full review to come once I'm able to upload all my photos! In the mean time, here's a hint:

Thursday, July 21, 2011
Grilled Ricotta and Shrimp with Cilantro Pesto
You know what's gross? Eating soap.
You know what's even more gross? Eating an herb that tastes like soap.
Yes, to me, cilantro tastes like soap. And if you're at all like me (and thousands/millions of others) you would agree that cilantro is certainly not an enjoyable taste. In fact, I remember finding a video a few months back explaining why it is that some people just hate cilantro. Unfortunately I wasn't able to locate it again, but I did find this much more in-depth article. I'll admit that I was too lazy to actually read the whole thing... oopse. Much easier to read was http://www.ihatecilantro.com/, a website featuring various odes to the hatred of cilantro. One of my favorites is a haiku that goes a little something like this:
"Here, have some salad."
Alas! Cilantro within
Taste the soapiness.
But I digress. The beauty of me working my way through GGC is that I can modify any recipe any way I want! And I'm nothing if not a rebel ;-P So during my shopping trip I decided cilantro was out and basil was in. I was making pesto, and I've traditionally heard of pesto as being made with basil, so I figured this was an acceptable (and more palatable) substitute. I had some shrimp in my freezer at home as well as the leftover ricotta, so all that was left to buy was sourdough bread, pecans and Parmesan cheese! GGC actually recommends using dry jack cheese, but notes that if you can't find it then Parmesan is an adequate substitute. As for the bread, the recipe calls for pain au levain or hearty white or sourdough, so sourdough it was (a totally arbitrary decision on my end).

Step one was making the pesto. I was a little intimidated by this step since it involved putting the pesto ingredients in a food processor and processing them until they formed a "paste." Wellll I don't own a food processor, so I decided a (hopefully adequate) substitute would be my roomie's smoothie maker-- she wasn't home to give me official permission to use it, but again, I'm a rebel.
The smoothie maker wasn't that big (it is, after all, intended to make one smoothie), so I opted to chop the ingredients in steps. First up were the pecans-- about 1/2 cup to be exact. Cowering ever so slightly as I pressed the power button on the smoothie maker, I was pleasantly surprised to find that the blades chopped the nuts quite easily! Unfortunately they only chopped the nuts in the very immediate vicinity of the blades, forcing me to wedge a fork around (without the power off, of course) to mix up the nuts so that everyone got a turn near the blades.
Next up was the basil-- the recipe called for a "bunch of cilantro with big stems removed," so I estimated about 6 big stems worth of basil leaves, but this quantity is easily adjusted based on one's affinity for basil. The basil also chopped up surprisingly easily/evenly.

Admittedly the results were more "chunky" than paste-like, but I was fine with that. A little chunky pesto never hurt anyone (well, anyone without a nut allergy that is). The nuts/basil were supposed to be food processed with some of the grated Parmesan cheese, but there was no way all of that was fitting into the smoothie blender. Instead, I just put the Parmesan right in the bowl with the basil and nuts. The recipe called for 1/4 cup of finely grated Parmesan, but with a rebel yell I cried "More, more, MORE!" and went with a very heaping/bordering on 1/2 cup serving of cheese.

Looked pretty good to me! Next came 6 tablespoons of olive oil to give this a smoother and more spreadable texture.

Even better! It tasted pretty good too, although my olive oil isn't the highest quality out there, so I think that may have put a little damper on the overall taste. Anyway, on to the sandwiches!
The shrimp I had removed from the freezer hadn't quite thawed all the way, so I gave them a quick turn in the frying pan to melt any remaining ice. Probably not a great idea, but as we all know I'm a what? I'm sure you've got it by now ;-)

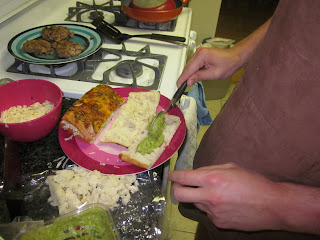
Now it was time to assemble the sandwiches, but due to a shoddy cutting job by the bread machine at Safeway, all the slices of bread had gaping holes in them (sadly I wasn't able to hit my tried and true Wegmans this week due to some time constraints-- a decision I'm regretting now). Oh well, I'll persevere.

Step 1 was spreading 8 ounces of ricotta evenly over four slices of bread that had been olive oiled on one side. Spreadable cheese + holes = mess, but I chose to ignore this fact.

Next came the pesto, again spread evenly.

Looking good :-) Then came the shrimp, you guessed it, spread evenly.
My penultimate act of rebellion was proceeding to add EVEN MORE Parmesan cheese. I had been snacking on it during preparations and decided it was good enough to earn a more prominent place in the sandwich.

Next came the second slice of olive oiled bread and I was ready to grill... well, as ready to grill as one can be when their sandwiches all have huge holes in them. My plan was to choose whichever side had the smaller hole and start there. It worked well enough, but once some ingredients started to seep out they sort of charred themselves onto the pan, which combated the non-stick features. I compensated by adding dashes of olive oil and cooking spray (not necessarily at the same time).


Taste Review:
Unlike most of our taste test sessions, we were both pretty quiet as soon as we started eating-- I wasn't really sure what flavors I was getting because the whole thing tasted pretty bland. Upon further reflection it was clear that the pesto is the strongest taste. It was good that we had the creamy ricotta to contrast the chunkiness of the pesto, but since ricotta is pretty bland it didn't actually create a well rounded flavorful foil to the pesto.
Highlights were bites where we got a shrimp. The recipe called for so few that they weren't actually spread evenly over the sandwich, so we didn't always get shrimp, but when we did they provided the flavor enhancement necessary to compliment the pesto. So, obviously, an improvement to the sandwich would be covering it in shrimp as evenly as we covered it in ricotta and pesto.
Overall, the sandwich was just sort of bland. I wanted more Parmesan to enhance the flavor (surprise, surprise), but Colin wanted more pesto. The point here is that we needed something else. I also got a funny aftertaste, which I attribute to either the sourdough or the olive oil. It would be interesting to re-try this recipe with white bread and higher quality olive oil. I didn't end up finishing my sandwich, and that's always a bad sign. It was just too bland. As usual, there's room for improvement, but this one just didn't do it for me.

Next Week: I'm travelling for the next two weeks, so I'll try to squeeze in at home sessions early on in both weeks, but at a minimum I promise field reports from my destinations!
You know what's even more gross? Eating an herb that tastes like soap.
Yes, to me, cilantro tastes like soap. And if you're at all like me (and thousands/millions of others) you would agree that cilantro is certainly not an enjoyable taste. In fact, I remember finding a video a few months back explaining why it is that some people just hate cilantro. Unfortunately I wasn't able to locate it again, but I did find this much more in-depth article. I'll admit that I was too lazy to actually read the whole thing... oopse. Much easier to read was http://www.ihatecilantro.com/, a website featuring various odes to the hatred of cilantro. One of my favorites is a haiku that goes a little something like this:
"Here, have some salad."
Alas! Cilantro within
Taste the soapiness.
But I digress. The beauty of me working my way through GGC is that I can modify any recipe any way I want! And I'm nothing if not a rebel ;-P So during my shopping trip I decided cilantro was out and basil was in. I was making pesto, and I've traditionally heard of pesto as being made with basil, so I figured this was an acceptable (and more palatable) substitute. I had some shrimp in my freezer at home as well as the leftover ricotta, so all that was left to buy was sourdough bread, pecans and Parmesan cheese! GGC actually recommends using dry jack cheese, but notes that if you can't find it then Parmesan is an adequate substitute. As for the bread, the recipe calls for pain au levain or hearty white or sourdough, so sourdough it was (a totally arbitrary decision on my end).

Step one was making the pesto. I was a little intimidated by this step since it involved putting the pesto ingredients in a food processor and processing them until they formed a "paste." Wellll I don't own a food processor, so I decided a (hopefully adequate) substitute would be my roomie's smoothie maker-- she wasn't home to give me official permission to use it, but again, I'm a rebel.
The smoothie maker wasn't that big (it is, after all, intended to make one smoothie), so I opted to chop the ingredients in steps. First up were the pecans-- about 1/2 cup to be exact. Cowering ever so slightly as I pressed the power button on the smoothie maker, I was pleasantly surprised to find that the blades chopped the nuts quite easily! Unfortunately they only chopped the nuts in the very immediate vicinity of the blades, forcing me to wedge a fork around (without the power off, of course) to mix up the nuts so that everyone got a turn near the blades.
Next up was the basil-- the recipe called for a "bunch of cilantro with big stems removed," so I estimated about 6 big stems worth of basil leaves, but this quantity is easily adjusted based on one's affinity for basil. The basil also chopped up surprisingly easily/evenly.

Admittedly the results were more "chunky" than paste-like, but I was fine with that. A little chunky pesto never hurt anyone (well, anyone without a nut allergy that is). The nuts/basil were supposed to be food processed with some of the grated Parmesan cheese, but there was no way all of that was fitting into the smoothie blender. Instead, I just put the Parmesan right in the bowl with the basil and nuts. The recipe called for 1/4 cup of finely grated Parmesan, but with a rebel yell I cried "More, more, MORE!" and went with a very heaping/bordering on 1/2 cup serving of cheese.

Looked pretty good to me! Next came 6 tablespoons of olive oil to give this a smoother and more spreadable texture.

Even better! It tasted pretty good too, although my olive oil isn't the highest quality out there, so I think that may have put a little damper on the overall taste. Anyway, on to the sandwiches!
The shrimp I had removed from the freezer hadn't quite thawed all the way, so I gave them a quick turn in the frying pan to melt any remaining ice. Probably not a great idea, but as we all know I'm a what? I'm sure you've got it by now ;-)

Now it was time to assemble the sandwiches, but due to a shoddy cutting job by the bread machine at Safeway, all the slices of bread had gaping holes in them (sadly I wasn't able to hit my tried and true Wegmans this week due to some time constraints-- a decision I'm regretting now). Oh well, I'll persevere.

Step 1 was spreading 8 ounces of ricotta evenly over four slices of bread that had been olive oiled on one side. Spreadable cheese + holes = mess, but I chose to ignore this fact.

Next came the pesto, again spread evenly.

Looking good :-) Then came the shrimp, you guessed it, spread evenly.
My penultimate act of rebellion was proceeding to add EVEN MORE Parmesan cheese. I had been snacking on it during preparations and decided it was good enough to earn a more prominent place in the sandwich.

Next came the second slice of olive oiled bread and I was ready to grill... well, as ready to grill as one can be when their sandwiches all have huge holes in them. My plan was to choose whichever side had the smaller hole and start there. It worked well enough, but once some ingredients started to seep out they sort of charred themselves onto the pan, which combated the non-stick features. I compensated by adding dashes of olive oil and cooking spray (not necessarily at the same time).


Taste Review:
Unlike most of our taste test sessions, we were both pretty quiet as soon as we started eating-- I wasn't really sure what flavors I was getting because the whole thing tasted pretty bland. Upon further reflection it was clear that the pesto is the strongest taste. It was good that we had the creamy ricotta to contrast the chunkiness of the pesto, but since ricotta is pretty bland it didn't actually create a well rounded flavorful foil to the pesto.
Highlights were bites where we got a shrimp. The recipe called for so few that they weren't actually spread evenly over the sandwich, so we didn't always get shrimp, but when we did they provided the flavor enhancement necessary to compliment the pesto. So, obviously, an improvement to the sandwich would be covering it in shrimp as evenly as we covered it in ricotta and pesto.
Overall, the sandwich was just sort of bland. I wanted more Parmesan to enhance the flavor (surprise, surprise), but Colin wanted more pesto. The point here is that we needed something else. I also got a funny aftertaste, which I attribute to either the sourdough or the olive oil. It would be interesting to re-try this recipe with white bread and higher quality olive oil. I didn't end up finishing my sandwich, and that's always a bad sign. It was just too bland. As usual, there's room for improvement, but this one just didn't do it for me.

FINAL RESULTS:
Sandwich: | Grilled Ricotta and Shrimp with |
Gooey-ness: | 2.5 |
Aroma: | 2 |
Appearance: | Big hole, overly-charred with a nice Parmesan dusting. |
Taste: | C+ |
Gooey Scale | Aroma Scale |
| 1 = still cold/hard | 1 = can’t smell a thing |
| 2 = slightly melted but still firm | 2 = tender waft |
| 3 = melted evenly | 3 = makes your stomach growl |
| 4 = melted and slightly runny (starting to get those cheese strings between your sandwich and your mouth when you take a bite) | 4 = strong scent |
| 5 = runny | 5 = overpoweringly pungent |
| 6 = sloppy mess! |
Next Week: I'm travelling for the next two weeks, so I'll try to squeeze in at home sessions early on in both weeks, but at a minimum I promise field reports from my destinations!
Wednesday, July 13, 2011
Colin's Jalapeno Popper
As mentioned, this was the week for my sous chef to take to the main stage with a creation all his own! Finally the roles would be reversed-- I would sit on the couch watching TV while he worked tirelessly in the kitchen on a delicious dinner for us both :-) That was partly true-- but I turned out to be more of a back seat chef than I thought I would be (i.e. "Maybe you'd like to assemble the sandwiches before you put them in the pan?") But I like to think that my help was actually beneficial. I had told Colin about some jalapeno/cheddar bread that I saw at Safeway that he might want to experiment with, so our first stop was the store to acquire other ingredients to turn this bread into a full fledged grilled cheese. We ended up with the bread, pepper jack cheese, spicy guacamole and ground turkey.

Apron on and Kostritzer in hand (thanks, Mom) he was ready to attack!

The first step was grilling the turkey into patties. I wasn't entirely on board with this step due to my bias against sandwiches that focus too heavily on the meat and not enough on the cheese, so I politely requested that I be allowed to make one meatless sandwich as well. Colin gave the patties a splash of the Kostritzer just for the heck of it, but I'm pretty sure that probably cooked off.

While he worked on the meat I worked on slicing the bread. The bread was too thin to slice vertically, so I cut it into four big slices that I then cut in half horizontally (so it was sort of the thickness of ciabatta bread).

I tried to scoop out the insides a bit to remove some of the heft and allow for us to put more ingredients in, but it wasn't quite thick enough for this to be really successful. We also experimented with grilling just the bread in my rarely used sandwich press, but I don't think that really added much to the sandwich either.

From there Colin began his sandwich assembly... in the frying pan. He started out with a bottom piece of bread and sprinkled a little pepper jack in the middle. That was topped with a turkey patty.

Next came more pepper jack, also sprinkled in the middle on top of the patty.

And finally, a few dollops of guacamole.

For a beginner, Colin showed a surprisingly good command of the double spatula flip, which was particularly necessary for this sandwich seeing as how it was quite thick and heavy (thanks to the turkey patty).

While he worked on that, I went ahead and assembled my meatless variety, which involved a little more evenly spread ingredients.

Colin liked this approach and started preparing the remaining sandwiches for the pan.
The pepper jack melted surprisingly quickly, so the sandwiches were ready to go in no time at all!

 Yummmm


Apron on and Kostritzer in hand (thanks, Mom) he was ready to attack!

The first step was grilling the turkey into patties. I wasn't entirely on board with this step due to my bias against sandwiches that focus too heavily on the meat and not enough on the cheese, so I politely requested that I be allowed to make one meatless sandwich as well. Colin gave the patties a splash of the Kostritzer just for the heck of it, but I'm pretty sure that probably cooked off.

While he worked on the meat I worked on slicing the bread. The bread was too thin to slice vertically, so I cut it into four big slices that I then cut in half horizontally (so it was sort of the thickness of ciabatta bread).

I tried to scoop out the insides a bit to remove some of the heft and allow for us to put more ingredients in, but it wasn't quite thick enough for this to be really successful. We also experimented with grilling just the bread in my rarely used sandwich press, but I don't think that really added much to the sandwich either.

From there Colin began his sandwich assembly... in the frying pan. He started out with a bottom piece of bread and sprinkled a little pepper jack in the middle. That was topped with a turkey patty.

Next came more pepper jack, also sprinkled in the middle on top of the patty.

And finally, a few dollops of guacamole.

For a beginner, Colin showed a surprisingly good command of the double spatula flip, which was particularly necessary for this sandwich seeing as how it was quite thick and heavy (thanks to the turkey patty).

While he worked on that, I went ahead and assembled my meatless variety, which involved a little more evenly spread ingredients.

Colin liked this approach and started preparing the remaining sandwiches for the pan.

The pepper jack melted surprisingly quickly, so the sandwiches were ready to go in no time at all!

 Yummmm
Taste Review:
The bread was very crunchy-- probably because the jalapenos and cheese formed a hard crust on the outside to begin with and the hardness was intensified by the grilling. I tried the variety with meat first and was surprised by now not spicy it was (part of this could be because I got the first sandwich-- the one with not too much cheese). I guess there was such a thick patty of meat that it basically dulled all the spicy elements. The guacamole consistency made the inside nice and smooth-- this along with the melted cheese were a good contrast to the crumbly/firmer meat.
Then I moved on to trying my meatless variety. This was VERY different in that my mouth was lit on fire with the first bite. The pepper jack really takes hold and the spiciness is undeniable. Since the goal of this sandwich was to keep it spicy, I liked this version more. One way to potentially keep the meat on the sandwich and still maintain the spiciness would be to use less meat and spread it more evenly across the sandwich. This was basically a burger, but if you had meat that had been seasoned with some spices and spread throughout the sandwich that would help to maintain the overall spicy flavor.
I could take or leave the spicy guacamole-- but on the non-meat sandwich I actually think that regular guacamole would do better since it would provide just enough of a cool contrast to the strong heat from the cheese and bread. I would also add some cheddar to the non-meat sandwich just to have another element in place of the meat (and I think it would look neat to have a green/orange/white layered sandwich) and to give the pepper jack something to contrast with. But overall I'd say this was a success!

FINAL RESULTS:
Sandwich: | Colin's Jalapeno Popper |
Gooey-ness: | 3.5 |
Aroma: | 3 |
Appearance: | Bright green and white with a crispy cheese crust. |
Taste: | A- |
Gooey Scale | Aroma Scale |
| 1 = still cold/hard | 1 = can’t smell a thing |
| 2 = slightly melted but still firm | 2 = tender waft |
| 3 = melted evenly | 3 = makes your stomach growl |
| 4 = melted and slightly runny (starting to get those cheese strings between your sandwich and your mouth when you take a bite) | 4 = strong scent |
| 5 = runny | 5 = overpoweringly pungent |
| 6 = sloppy mess! |
Next Week: TBD, but potentially something utilizing my leftover ricotta and goat cheese from last week.
Thursday, July 7, 2011
Salami and Cheese 2 AND Red, White and Blue Grilled Cheese
No, your eyes do not deceive you-- this week I'll be featuring two different sandwiches! One from GGC (as usual) and one created by yours truly as a belated celebration of July 4. The GGC sandwich we're doing this week is the second in our two part series on salami and cheese. I can't say I entered this week with a higher opinion of salami-- it still grosses me out, but I'm willing to tough it out for one more sandwich.

The ingredients for this one sounded a lot like a classic Italian sub: Italian bread, olive oil, mozzarella, ricotta, pepperoncini and salami.
Much like last week, the first step was to cook the salami. Only this week, the salami did this weird thing where some of it would bubble up and not actually cook all the way. It ended up looking like weird little blisters on the salami. Not surprisingly, this didn't exactly make me anxious to give salami another chance.

This was basically all the prep work that was required, at least for the version I chose to prepare. The actual recipe called for cooking some fennel seed and grinding them up to add to the olive oil, but I definitely don't like fennel and didn't want a repeat of the cumin incident from Dutch Grilled Cheese. So I skipped straight to brushing one side of six slices of bread with olive oil (as usual, the recipe calls for 4, but the bread was small). From there I evenly spread 4 ounces of ricotta cheese over the bread.

Next came 6 ounces of mozzarella.

Now it was time for the pepperoncini. The recipe called for 12 pepperoncini that have been stemmed, drained, pitted and cut in half lengthwise.

While I was cutting them up I snuck a taste and realized they might be a little too spicy for me, so I opted to leave them off of one sandwich just in case.

Next came the salami. Same deal here-- left it off one sandwich, just because I'm not a huge fan.

Then it was into the frying pan. One of the perks of the slightly smaller sandwiches was that I could cook two at a time, so we were finished in no time!

Taste Review:
One of the strongest tastes you get in this sandwich is the pepper. It is very spicy, but actually kicks in as almost an after taste, which is interesting since I would've thought that a hot pepper would overpower everything else. In fact, there was no reason for me to be scared of the peppers-- they were spicy, but not too hot by any means.
The cheese is very creamy and provides a nice contrast to the crunchiness of the bread and salami. A big reason for the creamy texture is the ricotta cheese. On its own, ricotta is pretty bland, so it's good that it was paired with the mozzarella to give it some subtle flavor (I say subtle because mozzarella isn't the strongest cheese in the world). But the mildness of the cheese actually ended up giving the sandwich a pretty diverse flavor profile-- there was some spiciness, which was offset by the mildness of the cheese; the salami was salty, the bread was crisp, and the creaminess of the cheese meant it all blended together to go down smoothly. It also made the sandwich quite gooey:

The only potential change that Colin and I discussed was perhaps using a different meat. Obviously neither of us are really sold on the merits of salami, so Colin suggested ham as a blander meat that would still give the sandwich some saltiness (without a less than desirable after taste like salami). Colin thought about tasting the sandwich with some salsa, but found that it was flavorful enough on its own. Overall we both liked it more than we thought we would.

BUT WAIT!! THERE'S MORE!!!
As mentioned, I decided I also needed to pay homage to Independence Day by creating my own "Red, White and Blue Grilled Cheese." I pondered the possibilities for awhile and concluded that using blue cheese (the logical choice for blue) was less than ideal since this isn't exactly my favorite cheese. Luckily I remembered a delicious treat from the Wegmans bakery called "Red, White and Blue Bread."
Nutella), I decided goat cheese was the cheese to try here. So with that (and some cinnamon for good measure) I was ready to go.

Prep for this sandwich was easy because, well, I was the one making it up! I started with two slices of RW&B Bread:

I spread about 3 ounces total of goat cheese over the slices:

Then I sprinkled each with cinnamon:

And was ready to go! I topped each slice with another piece and placed one sandwich (buttered side down) into the pan. The heat in the pan was a little too intense for the delicate nature of the bread, so it actually ended up browning/burning pretty quickly :-/ But that's OK. After learning my lesson on sandwich one I turned the heat down very low for the second. I also tried sprinkling a little sugar on the butter before putting the sandwich in the pan to try to give it a sort of caramelized outer shell. This worked quite nicely!

That was basically it! Once the sandwiches were browned on each side they were ready for tasting.

Taste Review:
The sandwiches had a GREAT aroma-- thanks almost entirely to the cinnamon. You just can't beat the smell of warm cinnamon. The sandwich has a very breakfasty feel (probably because of the sweetness in the form of berries, cinnamon and sugar), but could actually do with being sweeter. The goat cheese is very bitter and provides almost too much of a contrast to the sweetness of the bread. Although the creamy texture of the goat cheese does mean the sandwich goes down smoothly, it would almost be better with something like cream cheese. Colin basically said he would be fine to have the bread with just some butter-- so really it's clear the bread was the standout here. But I do think it's fair to say that with a sweeter cream cheese filling this would be a very tasty sandwich (not that it wasn't also tasty with goat cheese). We definitely weren't disappointed, but it could use some tweaking.

Next Week: My sous chef is getting called up to the big leagues with a unique creation all his own!

The ingredients for this one sounded a lot like a classic Italian sub: Italian bread, olive oil, mozzarella, ricotta, pepperoncini and salami.
Much like last week, the first step was to cook the salami. Only this week, the salami did this weird thing where some of it would bubble up and not actually cook all the way. It ended up looking like weird little blisters on the salami. Not surprisingly, this didn't exactly make me anxious to give salami another chance.

This was basically all the prep work that was required, at least for the version I chose to prepare. The actual recipe called for cooking some fennel seed and grinding them up to add to the olive oil, but I definitely don't like fennel and didn't want a repeat of the cumin incident from Dutch Grilled Cheese. So I skipped straight to brushing one side of six slices of bread with olive oil (as usual, the recipe calls for 4, but the bread was small). From there I evenly spread 4 ounces of ricotta cheese over the bread.

Next came 6 ounces of mozzarella.

Now it was time for the pepperoncini. The recipe called for 12 pepperoncini that have been stemmed, drained, pitted and cut in half lengthwise.

While I was cutting them up I snuck a taste and realized they might be a little too spicy for me, so I opted to leave them off of one sandwich just in case.

Next came the salami. Same deal here-- left it off one sandwich, just because I'm not a huge fan.

Then it was into the frying pan. One of the perks of the slightly smaller sandwiches was that I could cook two at a time, so we were finished in no time!

Taste Review:
One of the strongest tastes you get in this sandwich is the pepper. It is very spicy, but actually kicks in as almost an after taste, which is interesting since I would've thought that a hot pepper would overpower everything else. In fact, there was no reason for me to be scared of the peppers-- they were spicy, but not too hot by any means.
The cheese is very creamy and provides a nice contrast to the crunchiness of the bread and salami. A big reason for the creamy texture is the ricotta cheese. On its own, ricotta is pretty bland, so it's good that it was paired with the mozzarella to give it some subtle flavor (I say subtle because mozzarella isn't the strongest cheese in the world). But the mildness of the cheese actually ended up giving the sandwich a pretty diverse flavor profile-- there was some spiciness, which was offset by the mildness of the cheese; the salami was salty, the bread was crisp, and the creaminess of the cheese meant it all blended together to go down smoothly. It also made the sandwich quite gooey:

The only potential change that Colin and I discussed was perhaps using a different meat. Obviously neither of us are really sold on the merits of salami, so Colin suggested ham as a blander meat that would still give the sandwich some saltiness (without a less than desirable after taste like salami). Colin thought about tasting the sandwich with some salsa, but found that it was flavorful enough on its own. Overall we both liked it more than we thought we would.

FINAL RESULTS:
Sandwich: | Salami and Cheese 2 |
Gooey-ness: | 4 |
Aroma: | 2 |
Appearance: | Nice colors-- bright peppers, white cheese, brown salami and bread. |
Taste: | B |
Gooey Scale | Aroma Scale |
| 1 = still cold/hard | 1 = can’t smell a thing |
| 2 = slightly melted but still firm | 2 = tender waft |
| 3 = melted evenly | 3 = makes your stomach growl |
| 4 = melted and slightly runny (starting to get those cheese strings between your sandwich and your mouth when you take a bite) | 4 = strong scent |
| 5 = runny | 5 = overpoweringly pungent |
| 6 = sloppy mess! |
BUT WAIT!! THERE'S MORE!!!
As mentioned, I decided I also needed to pay homage to Independence Day by creating my own "Red, White and Blue Grilled Cheese." I pondered the possibilities for awhile and concluded that using blue cheese (the logical choice for blue) was less than ideal since this isn't exactly my favorite cheese. Luckily I remembered a delicious treat from the Wegmans bakery called "Red, White and Blue Bread."
Nutella), I decided goat cheese was the cheese to try here. So with that (and some cinnamon for good measure) I was ready to go.

Prep for this sandwich was easy because, well, I was the one making it up! I started with two slices of RW&B Bread:

I spread about 3 ounces total of goat cheese over the slices:

Then I sprinkled each with cinnamon:

And was ready to go! I topped each slice with another piece and placed one sandwich (buttered side down) into the pan. The heat in the pan was a little too intense for the delicate nature of the bread, so it actually ended up browning/burning pretty quickly :-/ But that's OK. After learning my lesson on sandwich one I turned the heat down very low for the second. I also tried sprinkling a little sugar on the butter before putting the sandwich in the pan to try to give it a sort of caramelized outer shell. This worked quite nicely!

That was basically it! Once the sandwiches were browned on each side they were ready for tasting.

Taste Review:
The sandwiches had a GREAT aroma-- thanks almost entirely to the cinnamon. You just can't beat the smell of warm cinnamon. The sandwich has a very breakfasty feel (probably because of the sweetness in the form of berries, cinnamon and sugar), but could actually do with being sweeter. The goat cheese is very bitter and provides almost too much of a contrast to the sweetness of the bread. Although the creamy texture of the goat cheese does mean the sandwich goes down smoothly, it would almost be better with something like cream cheese. Colin basically said he would be fine to have the bread with just some butter-- so really it's clear the bread was the standout here. But I do think it's fair to say that with a sweeter cream cheese filling this would be a very tasty sandwich (not that it wasn't also tasty with goat cheese). We definitely weren't disappointed, but it could use some tweaking.
FINAL RESULTS:

Sandwich: | Red, White and Blue Grilled Cheese |
Gooey-ness: | 1.5 |
Aroma: | 4 |
Appearance: | Light sheen to a crispy colorful outside. |
Taste: | B+ |
Gooey Scale | Aroma Scale |
| 1 = still cold/hard | 1 = can’t smell a thing |
| 2 = slightly melted but still firm | 2 = tender waft |
| 3 = melted evenly | 3 = makes yourstomach growl |
| 4 = melted and slightly runny (starting to get those cheese strings between your sandwich and your mouth when you take a bite) | 4 = strong scent |
| 5 = runny | 5 = overpoweringly pungent |
| 6 = sloppy mess! |
Next Week: My sous chef is getting called up to the big leagues with a unique creation all his own!
Subscribe to:
Posts (Atom)