Thursday, March 31, 2011

Cheesy Gashouse Grilled Cheese

Any good UVA student is familiar with the Gus Burger-- a hamburger with a fried egg on top.  While I've never ventured to taste this famed sandwich, its popularity left me well prepared and unsurprised to find a recipe incorporating a fried egg into a grilled cheese.  The very basic summary of the gashouse grilled cheese is a grilled cheese with the center of the sandwich removed and replaced with a fried egg, but as you will see below-- the preparation is far more complex than that.

As always, step one was acquiring the ingredients.  I still had butter and white bread from last week and eggs are a fridge staple, so all I had to get was the cheese.  This particular recipe advocates for using either provolone, Gruyere or jack cheese in the sandwich.  In an ideal world I would have tried all three, but in the real world I have a budget and a stomach that is only so big-- two it was.  The Wegman's cheese selection (as partially shown in my last post) is pretty extensive, so I knew I would have no problem finding all three varieties and deciding from there which two to go with.  They had them all, but provolone only came in slices and since GGC advocates for using grated cheese I decided to go with Gruyere and jack (which came already grated and in a wedge respectively).

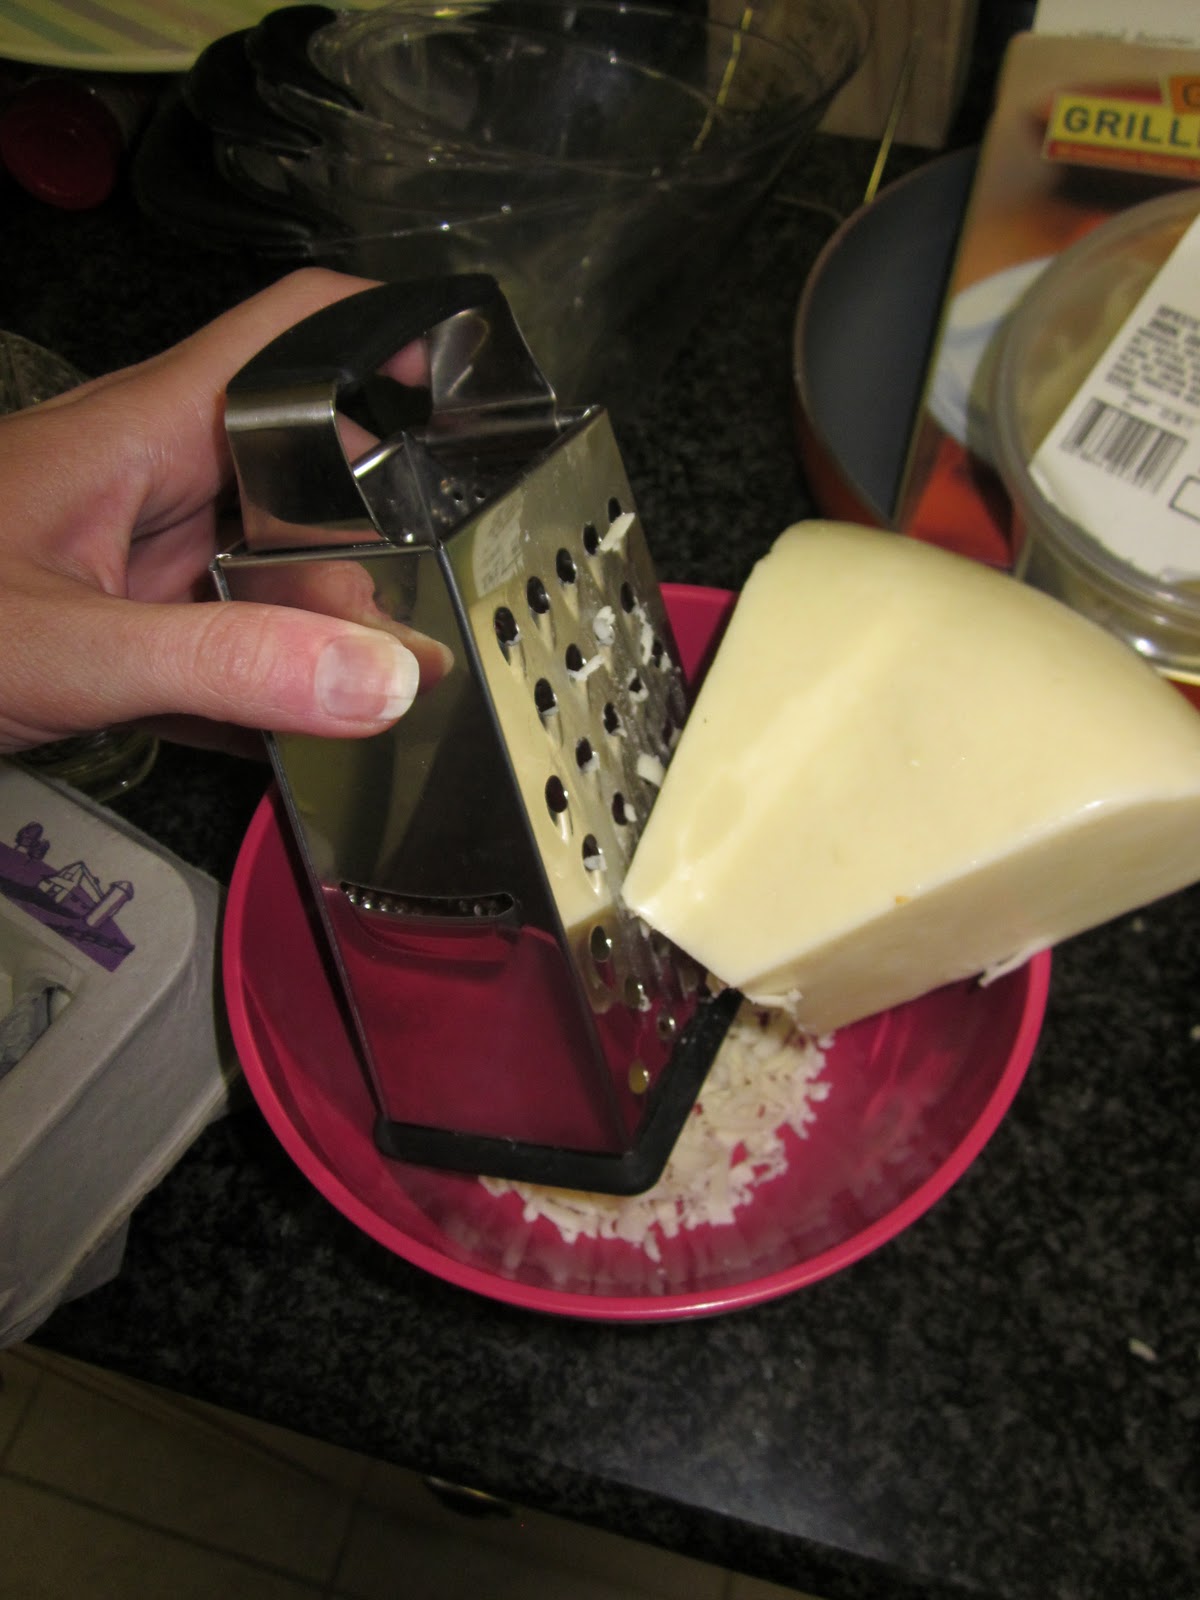
Once home I gathered all my materials together and took care of grating the jack cheese.


I'll take this chance to give a basic description of each of the cheeses:
Jack: Has the texture of mozzarella with more of a kick like a muenster or even mild cheddar.
Gruyere: Has a texture closer to Parmesan, but isn't quite as hard.  It also has a stronger and more bitter taste, also a bit like Parmesan. 


Jack Cheese on the Left, Gruyere on the Right

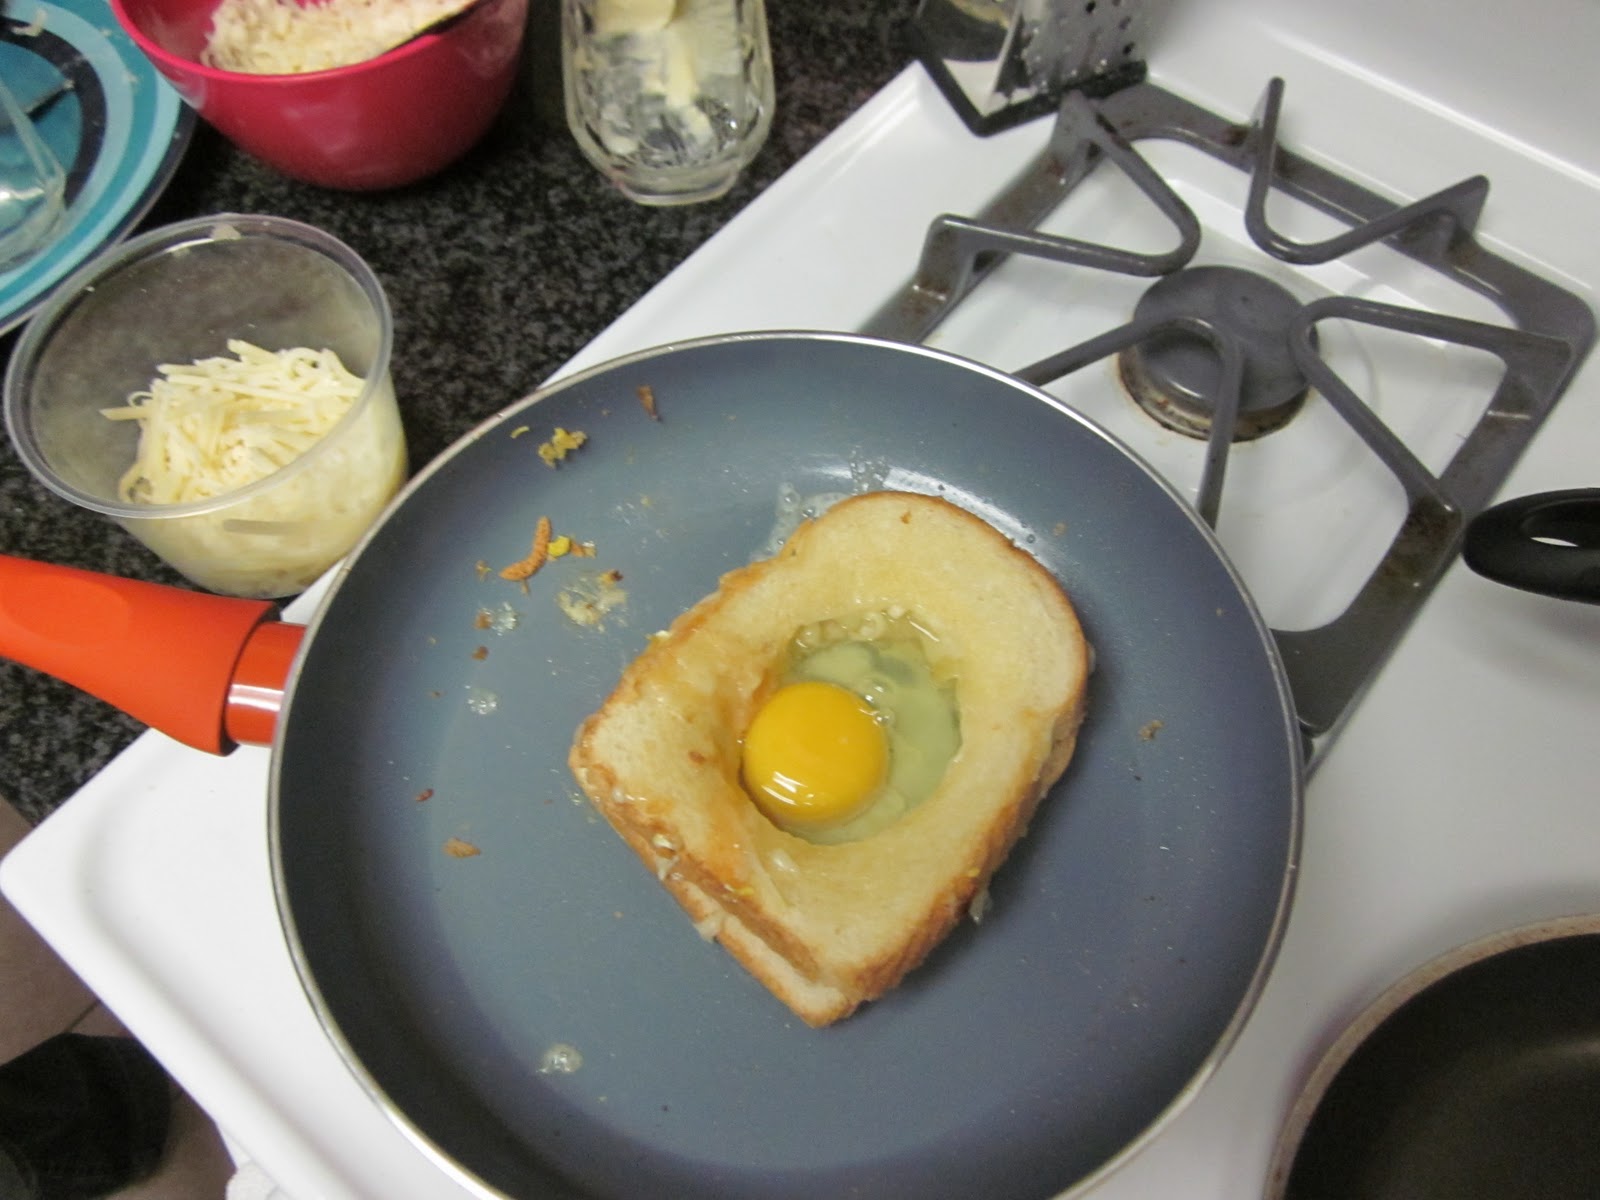
OK, time to get started!  Step one was buttering one side of four pieces of bread and placing them face down on a plate.   From there I used a glass to cut the center out of each piece of bread.  The hole was larger than I expected it to be leaving me to wonder how I would actually get the cheese to fit and stay between the slices.


The next step calls for even distribution of six ounces of shredded cheese onto the edges of the four slices of bread.  Since I had decided to use two types of cheese I got three ounces of each (1.5 oz/sandwich) and had my sous chef Colin help me in placing the cheese on the bread.  GGC warned that this would seem like a lot of cheese, but in the end it would be the perfect amount.  I was still skeptical...


While he was doing that I buttered four more slices of bread and cut holes in each of those.  Once all the cheese was in place I sandwiched them together with the freshly cut and buttered slices to make four hole filled sandwiches.


While I was pre-heating the skillet on a medium-low setting I decided to use the discarded centers of the bread and some of the leftover cheese to make mini grilled cheese appetizers :-)   Waste not, want not!


Yummm :-P

Once the minis were done cooking the pan was sufficiently warm, so I commenced cooking the first sandwich.  Some of the cheese fell out during the transfer from the plate to the pan, so I made a point of lifting up the top piece of bread to pile the excess back on the sandwich.  From there I covered the sandwich and let it cook for about two minutes.


Then it was on to the tricky task of flipping the sandwich.  After much trial and error over the course of the night I determined that the best way to do this is with two spatulas-- one in the hole and one on the edge.  This sometimes leaves the pieces of bread off kilter after the flip, but you can just use your hands to realign them.


This is where it's time to pick up the pace.  Immediately after flipping the sandwich you separate an egg over the cup you used to cut the holes in the bread.  You then pour the egg yolk into the hole in the sandwich and immediately pour the egg white over it. 


Just the Yolk
Yolk and Egg White
Cover that and let it cook for ~2 minutes before attempting to flip it.  I say attempt because the first flip with the egg added is even trickier than the very first flip since at this point most of the egg white and even some of the yolk will still not be cooked.  Again, the two spatula method comes in very handy here.  One other tip is to sort of slide the sandwich around the pan before trying to flip it-- this will expose uncooked parts of the egg to the pan which will make it ever so slightly easier to flip it.  Regardless of how you do it, the goal is to get the sandwich flipped over.

Once the initial flip with egg is executed, both sides will be cooked enough to solidify the egg and make it much easier to continue flipping as needed until both sides are golden brown and the egg is cooked to your liking.  Don't get too cocky, though!  I was going strong until my last sandwich when I inadvertently put the whole egg into the sandwich at one time causing a big eggy mess on one side of the bread :-/


Finished Product


Taste Reviews:


Gruyere: In my first bite I noticed a lot of egg taste, but didn't get a strong taste of the cheese.  Colin actually had the opposite reaction in that his first bite had a lot of cheese but not a lot of egg.  We determined this must just have to do with where you take your bite from since the cheese is concentrated on the edges and the egg is in the middle.  That's one thing about the sandwich that isn't ideal-- it's hard to get an even representation of both egg and cheese.  Once I did get to the cheese, I was surprised by how mild it was.  In the pre-sampling the Gruyere definitely tasted stronger and more bitter than the jack, but it must have lost some of that flavor in the cooking process.  Ultimately it tasted more like a seasoning than it did an actual element of the sandwich.  Colin tried his with ketchup and he said that the ketchup and cheese tasted fine, but the ketchup and egg were better.  In summary, for better or for worse, the egg seemed to be the main focus of this sandwich.


Jack: I found the jack easier to work with during the cooking process because its softer quality made it easier to pile it on the bread and have it stay there (the moistness helped the cheese stick to itself).  The inherent coagulative properties of the jack lent itself to a gooier end result than was yielded with the Gruyere.  The sandwich had a stronger overall cheese taste, particularly in the aftertaste, which means that the cheese that tasted more pungent before cooking was milder after cooking and vice versa.  I'm not sure why, but that was an interesting role reversal.  The jack sandwich also carried its own light aroma of crispy cheese (thanks to some of the cheese that spilled into the pan and cooked itself onto the outside of the bread.  Colin agreed that the jack sandwich was more savory and had a stronger cheesy taste than the Gruyere.  It was clear that both of us preferred this variety.

FINAL RESULTS:

Sandwich:
Gruyere Gashouse
Jack
Gashouse
Gooey-ness:
2.5
4
Aroma:
1
2.5
Appearance:
When made correctly you can hardly tell there's an egg in the center!  When made incorrectly it can be a big mess.
Taste:
B-
B+

Gooey Scale: 1 = still cold/hard, 2 = slightly melted but still firm, 3 = melted evenly, 4 = melted and slightly runny (starting to get those cheese strings between your sandwich and your mouth when you take a bite), 5 = runny, 6 = sloppy mess!
Aroma Scale: 1 = can’t smell a thing, 2 = tender waft, 3 = makes your stomach growl, 4 = strong scent, 5 = overpoweringly pungent.
Next Week's Selection: TBD!  But we will start venturing further into the uncharted territory of combining more ingredients than just cheese and bread to make grilled cheeses.

Wednesday, March 30, 2011

Sneak Peak!

Last night's grilled cheese making was delayed due to a social engagement, but to whet your appetite for our next post, here's a teaser: Even a real egg head doesn't know jack about tonight's sandwich!


Above: A small fraction of the Wegman's cheese selection.  Even though I was shopping for tonight's sandwich specifically, this planted lots of idea seeds in my head for future endeavors!

Wednesday, March 23, 2011

Original American Grilled Cheese

Let's start at the very beginning, a very good place to start.  When you sing you begin with Do, Re, Mi, when you eat you begin with American Grilled Cheese! :-)  As previously mentioned, the very first grilled cheese sandwich I came to know and love was the classic white bread with American cheese.  Incidentally this was also the first sandwich listed in GGC (this makes sense considering this is the sandwich most people think of when the think of a grilled cheese).  Although this has been a tried and true favorite for years, in the spirit of accurately and completely following GGC, this was a crucial first step.  Shall we begin?

Step one was, of course, assembling the necessary ingredients.  You'll note GGC, butter, bread and American cheese of two varieties (yellow and white), and tomato soup.  The latter was briefly a point of concern for me considering I have always been able to enjoy just the sandwich sans any unnecessary flavor detractors (i.e. soup).  Colin was the one who requested tomato soup with our sandwiches and I wasn't a fan of the idea until I remembered that this is such a popular combination with the general public I thought it only fair to give it a try (you know, for the sake of research).

Each sandwich consists of two slices of yellow or white American cheese sandwiched between two slices of bread.  I had left the butter out all day to soften it up as GGC points out that it's easier to get an even spread when the butter is soft.  Right they were!  My lifelong problem of tearing the bread apart before it even hits the pan is officially tackled!

Now the sandwiches were primed and ready to go.  The non-stick pan was not greased and the sandwiches were sufficiently buttered.  I plopped the first sandwich in the pan and immediately made use of another GGC tip: covering the sandwich while it cooks.  This helps to trap in the heat and melt the cheese.
Cooking on my gas stove is something that has been a struggle for me from day 1.  It just gets so hot so quickly!  GGC suggests cooking most sandwiches on medium-high.  For my first sandwich this was fine considering the pan was still warming up, but by the fourth it was much too hot!  By that point I was toasting the bread before the cheese even had a chance to melt.  I turned the heat down and have resolved to try a lower heat next week-- I'd rather have to wait longer for the sandwich to cook than rush it and be met with burned bread and cold cheese.

I started off with a white American cheese sandwich:

Which was soon joined by its yellow counterpart (as promised, shot from overhead with full view of the official grilled cheese plates for perspective):


Now on to the most important part: the taste review!

White Cheese: For a long time I didn't even know that white American cheese existed.  I was introduced to this foreign concept in college and initially thought it tasted basically the same as yellow.  This sandwich making session has proven that theory wrong.  The white American cheese is much creamier and almost sweet compared to the yellow.  It tasted fattier and didn't have the sharpness that I look for in American cheese (not as sharp as a cheddar, but not as mild as a mozzarella).  It was almost as if the creamy flavors overpowered the rest of the sandwich, leaving me wanting a more evenly represented bread and cheese combination.  Colin (our resident dip the sandwich in the soup tester) concurred on the creamier taste and said that the white cheese did not go as well with the soup as the yellow.  He wondered if some of the creaminess factor may be related to the amount of butter on the bread.  This is a distinct possibility as his white American sandwich was the first one I buttered and early on I was quite liberal with the amount of butter used.  Duly noted for future sandwiches.

Yellow Cheese: It's hard to say anything negative about a taste that is such a staple in my diet.  The yellow American had just the right amount of sharpness without overpowering the bread, creating the perfect balance of grilled cheese deliciousness!  No single element stood out above the rest, and that's just how a traditional grilled cheese should be (IMO).  Colin noted that the sandwich went well with the soup (again, perhaps because this is such a beloved combination).  All in all it was clear that we both preferred the yellow American to the white.

FINAL RESULTS:

Sandwich:
Yellow American Cheese
White American Cheese
Gooey-ness:
2.5
3
Aroma:
3
2
Appearance:
Perfectly charred, neat and ready to eat!
Taste:
A+
B

Gooey Scale: 1 = still cold/hard, 2 = slightly melted but still firm, 3 = melted evenly, 4 = melted and slightly runny (starting to get those cheese strings between your sandwich and your mouth when you take a bite), 5 = runny, 6 = sloppy mess!
Aroma Scale: 1 = can’t smell a thing, 2 = tender waft, 3 = makes your stomach growl, 4 = strong scent, 5 = overpoweringly pungent.
All in all a successful week 1!  And even though I didn't find a way to blend in my vanilla milkshake flavor with the sandwich, I did manage to capture a vanilla milkshake taste after the fact ;-)


Coming Up Next Week: Cheesy Gashouse Egg Sandwich

Tuesday, March 22, 2011

Get Ready!

I believe it was Papa Partlow who said that in order to do a job right you have to have the right tools and today's lunch break was devoted to acquiring just those :-) I ventured to my local Home Goods in search of the perfect non-stick frying pan (GGC* advises that you use a non-stick skillet and rely on the butter on the grilled cheese for greasing the pan rather than using cooking spray). Considering basically all of my pans develop a mysterious blackish brown film when I cook in them, this was a very important errand.

The cookwares section of the store was pretty well stocked, so I felt good about my prospects. The first items I saw were spatulas-- one of which said "safe for non-stick pans." Oh shoot, does this mean I need a special spatula too?! *flashes back to mom telling me to only use one particular spatula with her nice non-stick pan* Yes, I do need a special spatula. Good thing there's one right in front of me! Alas, it cost $8. Upon perusing the rack further I found a slightly smaller (but also non-stick safe) variety for just $3. Sold.


(The winning spatula-- note the losing spatula #1 in the background)

Turning around in the aisle I also noticed a shelf of cheese graters of all shapes and sizes! Recalling that GGC recommends grating, not slicing, all cheese I started to reach for these before reminding myself that I have not one, but TWO cheese graters at home. At this point I realized I was in my classic "see something fun in the store and decide I need it just because" mode of shopping. No, I was here with one goal in mind and I had to stick to it. I immediately put my blinders on and made my way past the adorable aprons and dish towels to the frying pan wall.


So many choices! But alas most of them are actually the same pan in different colors. I spent awhile debating the merits of Teflon before remembering that I maybe once heard it wasn't so good for you? Does it give you cancer? Can't remember, but best to not risk it. This left me with the few non-Teflon options that were also non-stick. Luckily, there were these "green" pans that seemed to fit the bill (they felt quite smooth and non-stick, much like the Teflon, but to me the "green" label implied that if I eat things out of this pan I will still be cancer free in a few years). I decided that since the big pans were more expensive I would opt for a pan that was sized to hold one sandwich at a time (and presumably distribute heat to and cook said sandwich more evenly and efficiently). Now the most important debate of all: which color?  Since I already have a red frying pan (and purple was not an option), I chose the orange-- the color of cheese, one of the colors of UVA, and just a happy color in general.


Yay!  All done and ready for sandwich number one tonight!  Alas I removed my blinders on my walk to the register and fell victim to two medium sized polka dot plates which I have now dubbed the "Official Grilled Cheese Plates."  If nothing else they will help to provide consistent perspective as far as sandwich size is concerned.


* "GGC" will henceforth be used to refer to our source text: Great Grilled Cheeses: 50 Recipes for Stovetop, Grill and Sandwich Maker


Monday, March 21, 2011

Say Cheese :-D

Every time I hear the word "lunch" it makes me think of a grilled cheese sandwich and vanilla milkshake as made for me by my grandma. I loved grilled cheeses as a child and still love them today, so much so that for Christmas two years ago my dad gave me the following book: Great Grilled Cheese: 50 Innovative Recipes for Stovetop, Grill and Sandwich Maker with an inscription challenging me to try some of the recipes therein to see which, if any, compare to the Grandma Partlow original.

Well, two years later it's time for me to accept that challenge! My goal is to work my way through the book at a rate of approximately one grilled cheese per week and write down my findings a la "Julie and Julia." I also aim to intermix my experience with the book's recipes with some reports from the field (aka restaurants) and my own unique grilled cheese creations (is there a way to blend the grilled cheese and vanilla milkshake combo even more seamlessly? Probably not :-/, but that may not stop me from trying)!

Although my love of fried bread and cheese may lead to some biased reviews (I'm not sure it's even possible to create a not tasty grilled cheese), I think it will still be fun to track my culinary explorations (especially considering they are typically so few and far between). Bon appetit!