Showing posts with label B-. Show all posts

Thursday, July 19, 2012

Jalapeno Popper: The Sequel

This week is Colin's birthday, so I wanted to be sure that our sandwich reflected his tastes, which means one thing: it must be spicy.  You may remember that around this time last year Colin created his own jalapeno based sandwich.  We liked it then, but there's always room for improvement/innovation, and I had seen a jalapeno popper grilled cheese recipe floating around on Pinterest, so I decided to give it a try.  This one actually remains a little truer to the basic structure/ingredients of an actual jalapeno popper.


Ingredients are as follows:
* Jalapeno peppers (we used 3 total that we picked from our very own jalapeno plant, but four would have been ideal)
* Sourdough
* Cream cheese
* Cheddar
* Jack
* Butter
* Tortilla chips

Our first order of business was bisecting the jalapenos and putting them in the broiler for about 12 minutes (until their skins turned black like this):


Next I put them in a ziplock bag for them to stew in their own steam for awhile.  This makes it easier to peel off the skin.


While those were steaming I started preparing the sandwiches.  Since we only had 3 peppers we were only making 2 sandwiches (instead of our usual four), but again-- the ideal would be 4 peppers, 2 per sandwich.  I started by spreading 1 tablespoon of cream cheese on each slice of bread (4 Tbsp total).


Once that was taken care of I turned to the jack and cheddar cheeses.  The recipe calls for "1/2 cup jack and cheddar cheese, shredded," so I just went ahead and shredded as close to one cup as I could eyeball, trying to get an even representation of both cheeses.  Once that was done, I spread half of the cheese evenly on two of the slices of bread (saving the other half for later).


Once this was all done the jalapenos were about ready to be handled again, so I took them out of their bag, carefully peeled their skins off, and sliced them into strips.


They were then, of course, added to the sandwiches.


Next the recipe called for one tablespoon of crushed tortilla chips per sandwich.  An interesting choice, but I'm no stranger to putting creative ingredients on my sandwiches, so I was on board.


I then topped the chips with the remaining cheddar and jack.


From there it was all standard operating procedure-- sandwich the bread together, butter the outside of the sandwiches, and grill them up!  Before too long we had some delicious looking sammies on our hands.


Taste Review:

While the jalapenos were roasting they emitted a nice roasted pepper fragrance, but once they were inside of the sandwich their scent was muted by the cheddar cheese (the dominant aroma for this one).  Since we couldn't smell the jalapenos as strongly at this point, we were worried that they would also be overpowered from a flavor standpoint-- we were right; but it wasn't because of the cheddar cheese.  There's actually such a strong cream cheese presence that the cream cheese is what overpowers the jalapenos.  This might be an unfair judgment against the cream cheese since we didn't have as many jalapenos as we would've liked (and when I got a bite with the jalapeno it tasted like a great combination!) but this was all further evidence that we could, in fact, use some more jalapenos on this guy.

Surprise, surprise-- Colin elected to eat his sandwich with salsa and he said that this was a necessary decision.  He wasn't a fan of the strong cream cheese presence and needed another flavor to counter it.  We both agreed that the sandwich could use less cream cheese, but Colin argued that it shouldn't have any.  He actually had added some pepper jack to his sandwich and said that the pepper jack, monterey jack, and cheddar would be a perfect combination for this sandwich (with more jalapenos, of course).  The cream cheese does help to keep the filling creamy, but we started to wonder if there were other ways to do that as well (its rich flavor just wasn't the right fit).  We thought that maybe mixing sour cream in with the cheddar and monterey jack before adding it to the sandwich would give the adhesion necessary to keep the cheese on the sandwich gooey and would be a more appropriate flavor.

Last comment: the tortilla chips tasted chewy instead of crunchy, so they didn't really add much to the sandwich.  I'd say they should be a side dish with some salsa instead.


FINAL RESULTS:


Sandwich:
Jalapeno Popper 2
Gooey-ness:
3.5
Aroma:
2
Appearance:
Bright orange and yellow with green spots.
Taste:
B-


Gooey Scale
Aroma Scale
1 = still cold/hard
1 = can’t smell a thing
2 = slightly melted but still firm
2 = tender waft
3 = melted evenly
3 = makes your stomach growl
4 = melted and slightly runny (starting to get those cheese strings between your sandwich and your mouth when you take a bite)
4 = strong scent
5 = runny
5 = overpoweringly pungent
6 = sloppy mess!

Thursday, March 15, 2012

Green Goddess Grilled Cheese

Just in time for St. Patrick's Day I bring you a holiday grilled cheese that's sure to leave a lasting impression (for better or worse).  You know I like to play into holidays when possible, but I don't like many of the traditional foods associated with St. Patty's Day (i.e. corned beef and cabbage), so a green grilled cheese seemed the order of the day.  Luckily, my friends are always on the lookout for me and my friend Whitney (who you may remember from the Crawfish Bread Grilled Cheese) sent me a recipe that fit the bill: the Green Goddess Grilled Cheese (original recipe posted here).  My only knowledge of green goddess dressing stems from my infrequent, but much beloved, trips to The Melting Pot where they serve up green goddess as one of the condiments with your entree.  I've always loved the green goddess there (requesting additional ramekins basically every time I go), so was excited to try it as the star of a tasty sandwich.

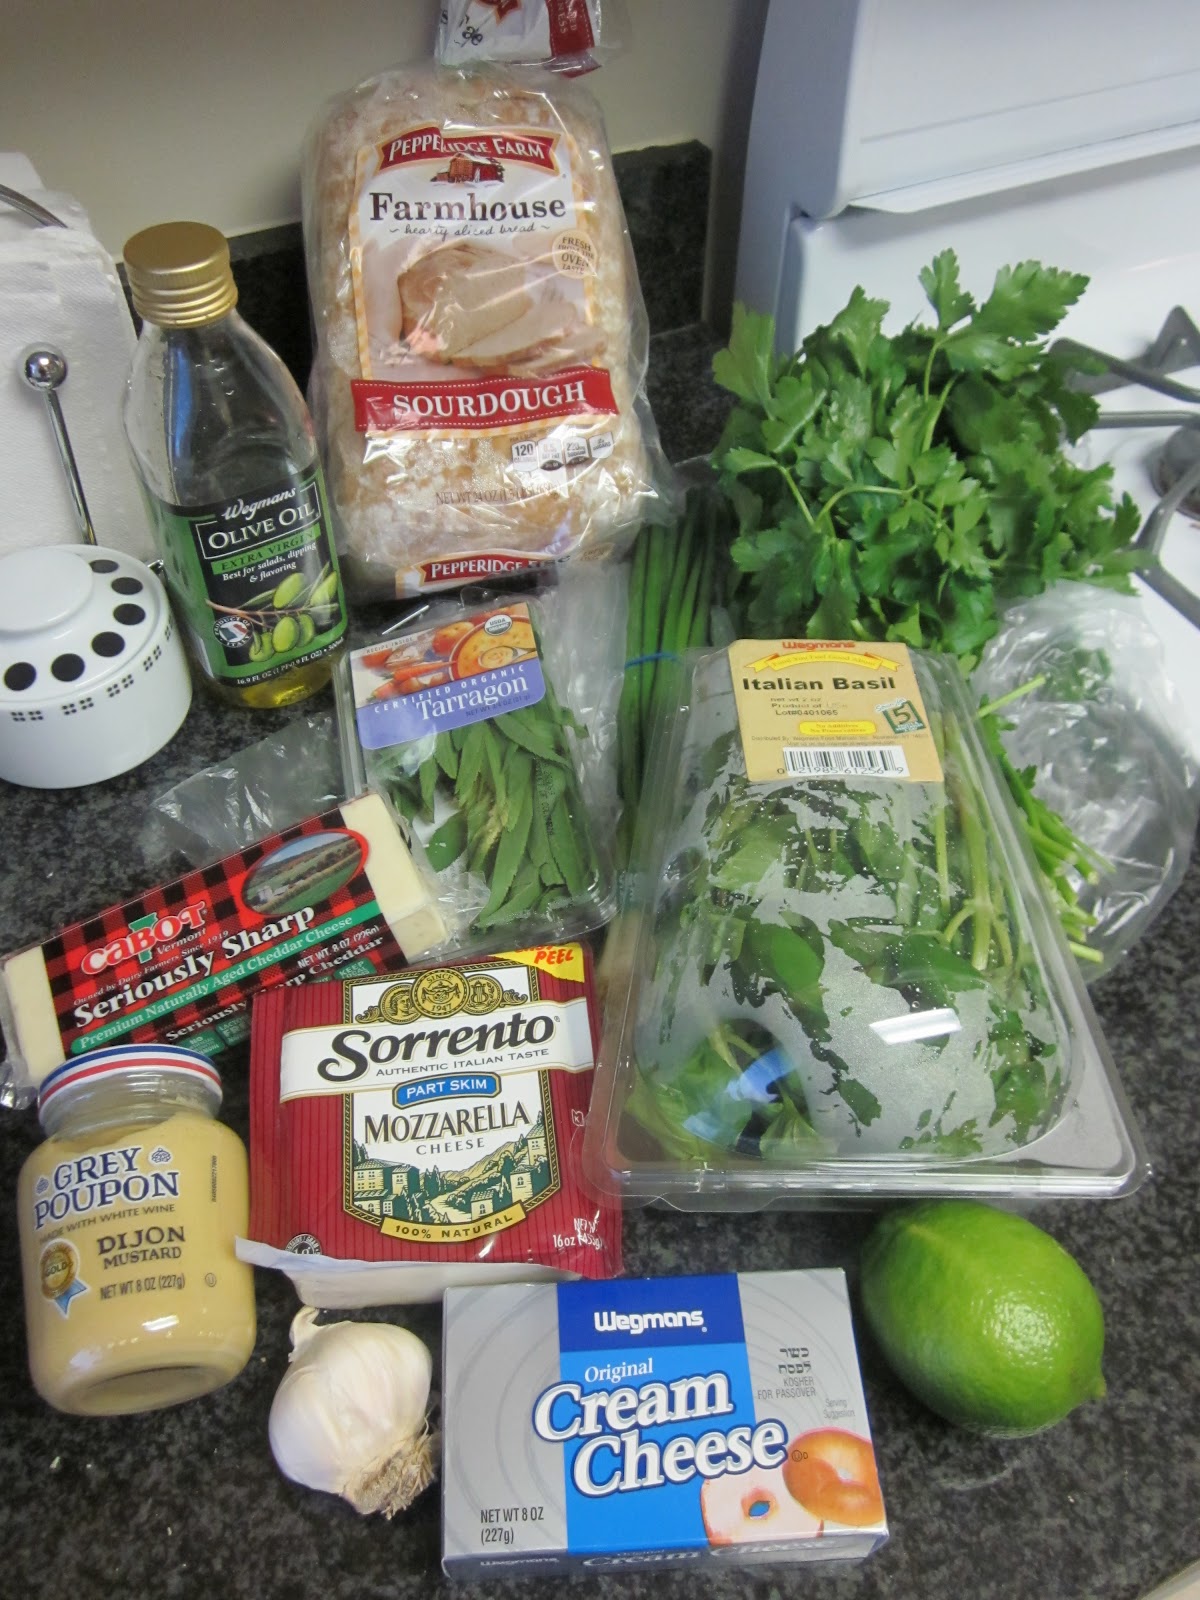
Not surprisingly, the ingredients are very herb heavy.  Something has to give it that green color, right?


1 clove garlic, 1 anchovy (skipped this-- no thank you on the anchovies for me), 1 tsp. lime zest, 3 Tbsp chopped parsley, 2 Tbsp chopped tarragon, 2 Tbsp cilantro (skipped this-- tastes like soap), 1 Tbsp chopped basil, 1 Tbsp chopped shallot (is that the same as scallions?  I hope so because that's what I got), 1/4 tsp Dijon mustard, 2 ounces cream cheese, 1 cup shredded mozzarella, 1 cup shredded cheddar, sourdough and olive oil.

Phew!  The ingredient list was long, but all of the items were very easy to find.  I was already feeling good about this one because it has two of my favorite sandwich components-- sourdough and cheddar!

Step one was mincing the garlic.  For this I employed my mini food processor :-)


We know I like to go overboard with the garlic, so I actually used more like 2 cloves.  Oh well!  Next came all the green components-- lime zest, parsley, tarragon (which smelled like spearmint to me), basil and shallot.  Since I was omitting the cilantro I did a little extra basil in an effort to maintain the right amount of herbs.  The mustard and cream cheese also went in and got blended up until it formed a nice green paste.


I then grated up 8 ounces of cheddar and 8 ounces of mozzarella and combined them in a mixing bowl.  A quick note on grated cheese-- it takes up more space by volume than not grated cheese (shocking, I know).  So in this situation with a recipe calling for 2 cups of cheese, I probably should have grated less than 16 total ounces to attain 2 measuring cups full of cheese.  BUT, I like cheese and to me 8 ounces means 1 cup, so that's what I went with.  To the bowl of cheese I added the green paste and mixed thoroughly.


Tasting this mixture I was overpowered by how pungent it was!  I think I forget that raw garlic is much stronger than cooked garlic, so I may have made a faux pas in adding more than the recipe called for.  The herbs weren't helping the situation either.  It was quite the flavor explosion.  With that in mind I decided to make 3 sandwiches as I had a feeling Colin would not a big fan of this one.


I brushed the bread slices with olive oil on one side and loaded the other with the cheese/green goddess mixture.  Closing the sandwiches with the second slice of bread left me ready to grill.  Since the filling was so dense I made sure to use my method of covering the sandwich with an additional (overturned) frying pan to trap in the heat.  I wanted to make sure that the cheese got gooey while it was cooking as I could tell this was destined to be runny!


Taste Review:

The first words that jumped to my mind upon taking a bite were creamy and STRONG!  The super pungent taste of the filling was only slightly dissipated during the cooking process, so it was still VERY strong, but at least a bit more piquant now.  The filling actually made the sourdough taste sweet by comparison, a feat that I didn't think possible.  In general, though, I felt like there were too many strong flavors all competing for top billing.  I think the extra basil and garlic weren't wise moves on my part as they both just slapped you in the face with flavor-- but then again, if I had lessened those quantities who's to say that another flavor wouldn't have taken over?  Overall I think this is best kept as a dressing since you're better able to moderate the amount you're eating.  Taken as an entree this is too strong for my taste!


FINAL RESULTS:


Sandwich:
Green Goddess
Gooey-ness:
3
Aroma:
5
Appearance:
Looks like pesto or guacamole.
Taste:
B-/C+


Gooey Scale
Aroma Scale
1 = still cold/hard
1 = can’t smell a thing
2 = slightly melted but still firm
2 = tender waft
3 = melted evenly
3 = makes your stomach growl
4 = melted and slightly runny (starting to get those cheese strings between your sandwich and your mouth when you take a bite)
4 = strong scent
5 = runny
5 = overpoweringly pungent
6 = sloppy mess!


Next year is the 1 year anniversary of The Big Grilled Cheese!  I'm sure some sort of retrospective will be in order.

Oh, and also-- happy belated Pi day.  I briefly debated a pie themed grilled cheese, but figured that might be hard to figure out, so I stuck with sipping on a drink filled with my Pi(ce) cubes :-)


In case you can't see that photo too well, here's the tray for proof:

Thursday, September 29, 2011

Hawaiian Grilled Cheese

Aloha!  Can anyone tell me what's better than going to Hawaii?  That's right-- bringing Hawaii to you!  Sadly there is no way to do that, but I figured I could try via a Hawaiian Grilled Cheese.  This is listed in the dessert section of GGC and looked sweet as sweet can be (seriously, you put sugar on it).  Ingredients are as follows:


1 loaf of Hawaiian sweet bread, 8 ounces of fromage blanc, 1/2 cup diced pineapple, 1/4 cup sweetened coconut, and 2 Tbsp. sugar (not pictured because it was in a styrofoam cup that I stole from my office-- no sense in buying a whole huge bag of sugar when I only needed 2 Tbsp.).  You'll note there's also some ham in the frame-- this is because I wanted to expand on the recipe and try something similar to a Hawaiian pizza (aka ham and pineapple).  I figured that could be my entree and the one without ham could be dessert!

Step one was spreading the coconut on a baking sheet and putting it in a 300 degree oven for 6-7 minutes.


It came out smelling yummy and looking like this:


While that was cooking I had been working on starting the rest of the filling.  Since I had a can of pineapple chunks lying around I wanted to make use of them, but the recipe calls for minced pineapple-- so I chopped the chunks up, but noticed that this caused a lot of the juice to run out, so I'd sort of try to scoop the juice into the bowl with the minced pineapple to preserve it.  Turns out this might not have been the best idea (I'll explain in a second). 

Once the pineapple was minced I added the fromage blanc to it.  I had never tasted fromage blanc before, and for those of you who haven't either I would best describe it as a sort of cross between Greek yogurt and sour cream.  So I stirred that in with the pineapple, the 2 Tbsp. of sugar and the toasted coconut.


Next I cut up four large slices of the Hawaiian bread (that I then cut in half to make manageable sized sandwiches) and buttered one side of each.  I was first introduced to Hawaiian bread when they used it for communion at church and man is it delicious!  It tastes just like dense angel food cake (needless to say, I was snacking on the excess).


The obvious next step was applying the pineapple mixture evenly to the slices of bread.  This is when I realized that my addition of the pineapple juice may not have been the best idea.  The mixture was really runny, almost like a thick soup consistency.  This didn't leave me feeling good about the prospect of it actually staying on the sandwich as I cooked it.  Oh well, I trust GGC to not lead me astray.


Next it was time for my rebellious deviation from the recipe-- I added the sliced brown sugar ham to two of the sandwiches.


I still wasn't confident that this would be enough to counteract the sweetness (I had sampled the mixture and it was pure sugar).  Lucky for me, I still had a smidgen of jack cheese left over from the spicy double jack sandwich, so I grated the cheese up and added it to one of the ham sandwiches.

Oh Snap!  Getting Crazy!
The instructions advised (after adding the second slice of bread) that I cut off the edges of the bread to make a tight seal around the sandwich.  They had suggested this for the hazelnut goat cheese grilled cheese and not following that suggestion was a mistake then, so I decided to give it a try this time.  However, after two cuts I realized this was just going to make more of a mess than it would save.

Notice the bread does not look pinched together at all.
Oh well, onwards and upwards!  Into the pan they went.  Since these were relatively small it was easy to fit two in the pan at one time.  GGC noted that Hawaiian bread is very soft, so it both tears and burns easily.  With this in mind I had the heat set to low and carefully tried to cook them.  I think my non-stick pan might be losing its thunder, though, because bits of the bread did keep sticking to the pan.  I opted to add a dash of non-stick cooking spray for the second round and that helped immensely.

First pass at cooking was NOT a pretty sight.

I ended up with the following results:


Does anyone else feel like the ham sandwich is sticking its tongue out at you?  Just me?  OK then...

They weren't quite as toasted as I usually like my sandwiches (I let my fear of burning them/the difficulty in flipping them scare me into not cooking them for long enough), but resolved this when making the second batch by cooking them on a slightly higher heat.  Here's one of those:


Taste Review:

I started off with the "entree" aka sandwich with ham.  It was literally hard to hold it because the bread is so soft (and prone to holes).  Immediately upon tasting it I was grateful for the ham-- the sandwich is so sweet that there has to be something to balance out that sugar and the ham was definitely trying.  I didn't notice the jack cheese (which is surprising because usually it's a good sharp contrast), but I'm sure it must have been helping because things were SO SWEET that anything even slightly balancing it out would make a difference.  The obvious need for the ham made me curious as to what the non-ham sandwich would taste like, so I switched over and tried some of that one.

fromage blanc is just there to provide a base to which the sweets can be added.  I went ahead and finished this one so I could move back to the better tasting ham.

Coming back to the first sandwich only reaffirmed how crucial the ham is to counteract the sugar.  Again I wished that I had charred this sandwich more, but live and learn!  However, even with the ham I still might call this a dessert grilled cheese.  The ham was trying to mute the sweetness, but the sugar was just so strong it was hard to overpower. 

A potential tweak to the recipe to tame the sweetness would be to not add sugar.  I'm not sure why sugar was deemed necessary when everything else was so sweet!  And if that isn't enough de-sweetening for you, changing out the type of bread might help too.  I would like to see this to move closer to literally being a ham and pineapple grilled cheese (similar to a ham and pineapple pizza).


FINAL RESULTS:

Sandwich:
Hawaiian Grilled Cheese
Hawaiian Grilled Cheese with Ham
Gooey-ness:
5 (runny, not gooey)
4.5 (less runny b/c of ham, but still runny)
Aroma:
2
2
Appearance:
Both sandwiches looked yellow and mushy/goopy, one of them just happened to have some ham hanging out as well.
Taste:
B-
B

Too sweet for me (which is saying a lot because I have the biggest sweet tooth known to man), but could be improved upon by toning down some of the sweeter ingredients and playing up some savory ingredients.

Gooey Scale
Aroma Scale
1 = still cold/hard
1 = can’t smell a thing
2 = slightly melted but still firm
2 = tender waft
3 = melted evenly
3 = makes your stomach growl
4 = melted and slightly runny (starting to get those cheese strings between your sandwich and your mouth when you take a bite)
4 = strong scent
5 = runny
5 = overpoweringly pungent
6 = sloppy mess!


Next Week: Back to the savory side with a super cheesy creation!